Journals can be entered directly into Oracle via the Create Journal
task, or you can opt to create specific journal entries using an Excel
workbook template downloaded from within Oracle. The Excel workbook template
contains worksheets for entering a single journal, multiple journals,
or bulk journals and provides a button for uploading the journals directly
into Oracle.
To upload journals using the downloadable Excel workbook template, the
Oracle Application Developer Framework Desktop Integration (ADFdi) add-on
must be installed. See ADFdi
Installation for the steps to download and install the application.
| Step |
Action |
Illustration |
1 |
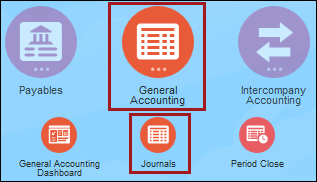
Click General
Accounting and select Journals.
The Journals
screen appears. |
 |
2 |
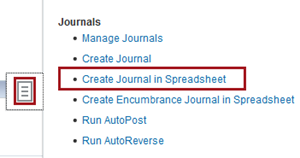
Click the Task
 icon on the right side of the
screen and select Create
Journal in Spreadsheet. The Opening
JournalEntry.xlsx pop-up window appears. icon on the right side of the
screen and select Create
Journal in Spreadsheet. The Opening
JournalEntry.xlsx pop-up window appears. |
 |
3 |
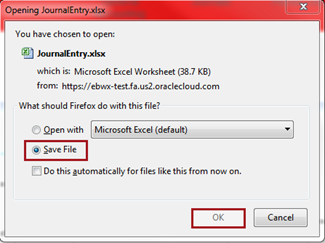
Ensure Save
File is selected and click OK.
The file is downloaded and waiting to be opened from the Downloads
button in the Firefox task menu. |
 |
4 |
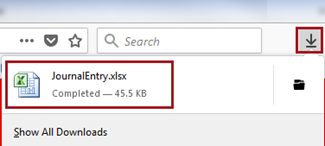
Click the Downloads
icon in the Firefox task menu and click the JournalEntry.xlsx
file to open it.
Microsoft Excel initiates and opens the file. |
 |
5 |
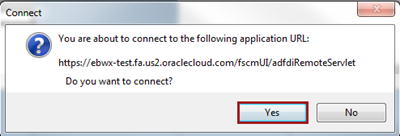
A Connect
pop-up appears indicating that a connection to Oracle is being
established. Click Yes.
Note:
If prompted to sign into Oracle, enter your credentials
and click Sign In.
See Step 6. |
 |
6 |
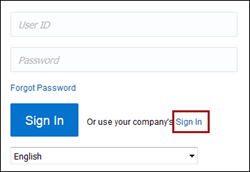
On the Login
Prompt, double click the company Sign
In for single sign on access.
The RNET login
displays. Enter the RNET credentials and click Sign
In.
|
  |
7 |
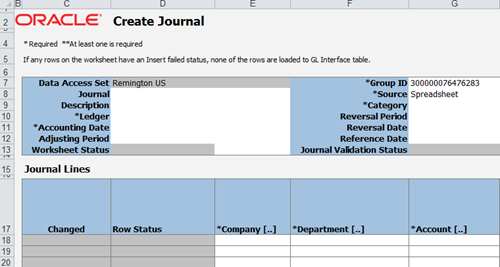
The Excel
template opens fully.
Ensure the appropriate worksheet is activated. |
 |
8 |
Complete all business-required
cells in the header and Journal
Lines sections, marked with an *.
Note:
- Document the Journal Name for quick
reference when verifying that the journal uploaded successfully
in later steps.
- If the Company
code is unknown, double-click the cell to look up and select
the appropriate account code based on input parameters. Selecting
the code auto-populates the Company, Department, Account,
Project, InterCompany, Future1, and Future2 fields.
Important: Do not alter
fields formatted in gray or the following fields:
|
 |
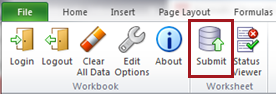
9 |
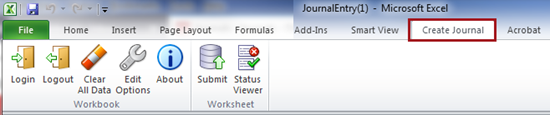
When the entries are complete,
click the Create Journal
tab to view the ADFdi add-in tasks. |
 |
10 |
Click Submit.
A Log
In prompt displays.
A Submission
Options pop-up appears. |
 |
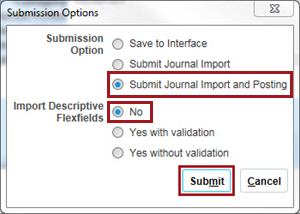
11 |
Select the following options and
click Submit:
- Submission Option:
Click the default, Submit
Journal Import and Posting.
Submit
and Post
is the only option that should be used.
Clicking
any other option may delay the posting up to 24 hrs.
- Import Descriptive Flexfields:
No
A Confirmation window
appears showing the process has been submitted. |
 |
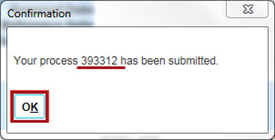
12 |
On the Confirmation
window, notate the submission number for validation.
Click OK.
In the Journal
Lines section, the process will display and the Row Status field changes
for to Success for a successful upload. |
 |
13 |
To verify the journal uploaded
correctly, see Verify
Journal Upload |
|
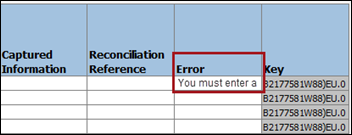
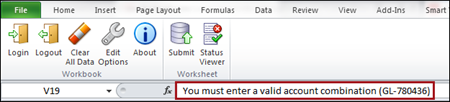
14 |
If an error is detected in a journal
line, an Error column
displays the error message.
Click the Error
cell to see the complete message in the Formula
bar. |
 |