| Step |
Action |
Illustration |
1 |
When the iBuy
Efficient zip files
are available in the AP/Output
Directory on the REM-WAMP
server, they need to be uploaded into Oracle.
To upload the files, log into Oracle. |

 |
2 |
On the Oracle
home screen, click the Tools
menu or the Navigator
icon and select Scheduled Processes. |
 |
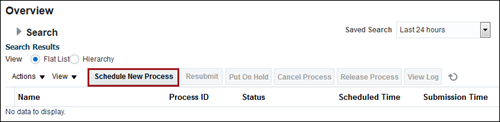
3 |
On the Scheduled
Process Overview screen, click Schedule
New Process. |
 |
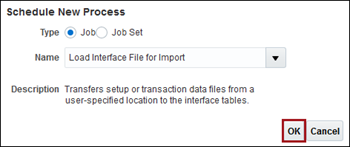
4 |
The Schedule
New Process window displays.
Click the arrow to see the list of processes,
select Load Interface File for
Import, if it is listed in the options.
Click Search
to search and select the process. |
 |
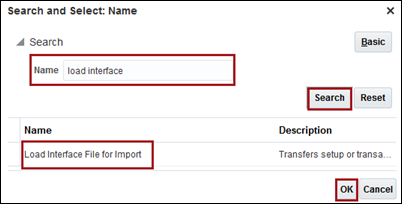
5 |
On the
Search and Select: Name window, enter the process and
click Search.
The process displays in the search results list.
Select the process and click OK.
|
 |
6 |
The process Name
populates in the Schedule New
Process window, along with the Description.
Click OK.
The Process
Details screen displays. |
 |
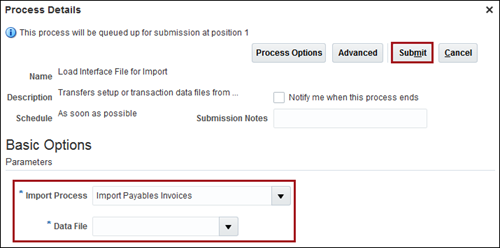
7 |
On the Process
Details screen, select the following:
- Import
Process: Select Import Payables Invoices from
the list.
- Data
File: Upload the data file provided by iBuy.
Click Submit.
|
 |
8 |
A confirmation window displays
with the process ID. Click OK. |
 |
Follow the steps below to import the file uploaded in the section above.
| Step |
Action |
Illustration |
1 |
On the Scheduled
Process Overview screen, click Schedule
New Process. |
|
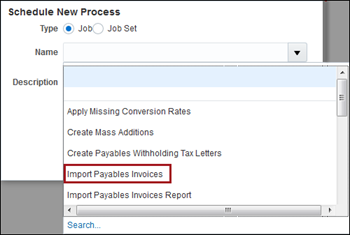
2 |
The Schedule
New Process window displays.
Click the arrow to see the list of processes,
select Import Payables Invoices,
if it is listed in the options.
To Search for
the Process Name:
If the process name isn't listed, click Search to search and select
the process. |
 |
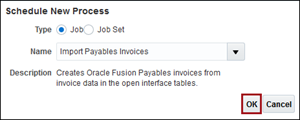
3 |
The selected process Name
populates in the Schedule New
Process window, along with the process Description.
Click OK.
The Process
Details screen displays. |
 |
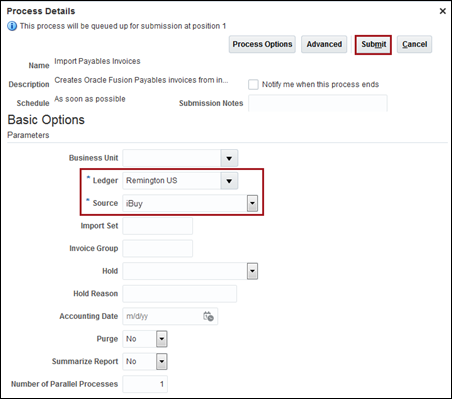
4 |
On the Process
Details window, select the following:
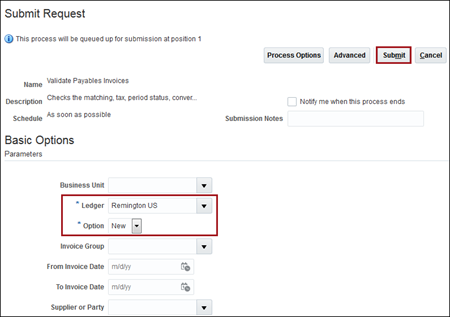
- Ledger
Select Remington US
- Source:
Select iBuy.
- Leave the Business Unit and
all other fields as is.
Click Submit.
|
 |
5 |
A confirmation window displays
with the process ID. Click OK. |
|
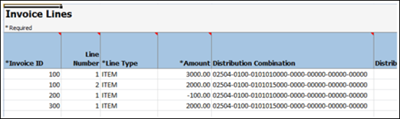
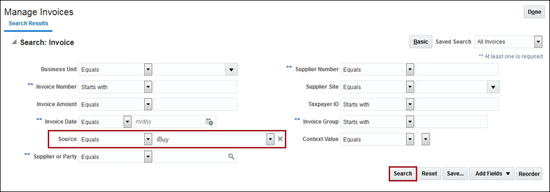
6 |
Verify the files were imported
by navigating to the Manage Invoices
search.
To search for
iBuy Invoices:
- Click the Advanced
button
- Select
Add Fields .
- Add the Source field.
- Select iBuy
- Click Search.
The iBuy invoices display
in the Search Results
list.
Click Done to close
the search screen. |
 |
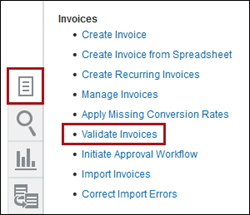
Follow the steps below to validate the invoices imported in the previous
section.
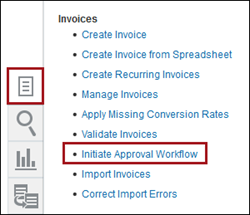
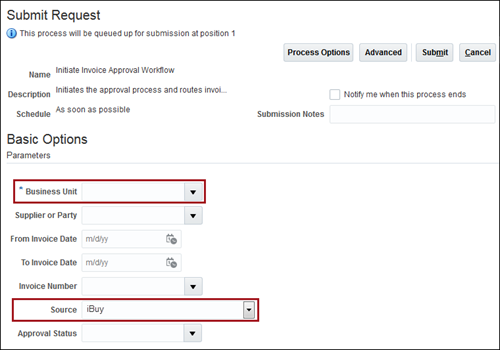
Follow the steps below to initiate the approval workflow for the iBuy
invoices validated in the section above.